Visualizzazione post con etichetta Ricordi di infanzia. Mostra tutti i post

lunedì 20 gennaio 2014

LE CHIACCHIERE DI CARNEVALE AL SUCCO DI MANDARINO


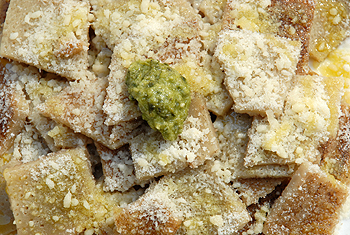
Le chiacchiere di Carnevale sono sempre molto gradite sia dai grandi che dai piccoli... veramente sono come le ciliegie e una tira l'altra!!! Appunto perché spesso è difficile riuscire a fermarsi, ho preferito alleggerire un pò la ricetta originale, sostituendo 2 delle 3 uova con del succo di mandarino: il sapore direi che ne guadagna ed anche la digeribilità... provatele!!! E se notate non c'è il burro, ma l'olio extravergine di oliva...... 

INGREDIENTI:
500g farina bianca
la buccia grattugiata di un'arancia bio
1 uovo
50ml di liquore aromatico 
50ml di olio extravergine
100ml di succo di mandarino
1 cucchiaio colmo di zucchero bianco
1 pizzico di sale fino
olio di semi di arachidi per friggere

Innanzi tutto disponete la farina in una ciotola ed unite la buccia dell'arancia bio grattugiata, lo zucchero e il pizzico di sale. Bisogna che la farina si aromatizzi bene.... Nel frattempo preparate il succo di mandarino: io ho usato una centrifuga. Aggiungete il succo di mandarino alla farina, incorporate l'olio extravergine, il liquore (qui la ricetta tradizionale prevede il Marsala, ma io ho usato un liquore biologico alle erbe di montagna... va bene anche il limoncello o i liquori agli agrumi. Dipende dal vostro gusto...) e mescolate bene sino ad ottenere un impasto liscio e gommoso. Fate riposare l'impasto per una quindicina di minuti, quindi stendete con il mattarello fino ad arrivare ad una sfoglia di un millimetro di spessore (si può usare anche la macchinetta per la pasta, ma io preferisco fare la sfoglia a mano, perché diventa più rustica e croccante), quindi ritagliate a losanghe o come più vi piace (quando faccio un solo impasto mi piace dare forme varie alle chiacchiere per rendere il vassoio meno monotono e più divertente). Mettete abbondante olio di semi di arachide in una padella non troppo grande, con fiamma vivace e quando l'olio sarà bello caldo iniziate a mettere le chiacchiere; mettetene poco per volta perché cuociono in pochissimi minuti e rischiereste di bruciarle!!! Scolate le chiacchiere disponendole su un foglio di carta da cucina e alla fine spolverizzatele di zucchero al velo molto abbondantemente. 

In alternativa potete spolverizzare di cannella in polvere o con una miscela di zucchero e cannella a seconda del vostro gusto..... 

In casa mia questo dolce piace talmente che solitamente raddoppio la dose dell'impasto e ne preparo solo una metà: l'altra la congelo e la tiro fuori al bisogno!!! Con i ragazzi in casa, meglio farsi trovare sempre pronti per una merenda al volo sana e leggera..... 

THE "CHIACCHIERE" OF CARNIVAL IN MANDARIN JUICE

The chiacchiere of Carnival are always very welcome by both the large and the small ... really are like cherries and one leads to another ! Precisely because it is often difficult to stop, I decided to lighten up a bit to the original recipe , replacing 2 of the 3 eggs with the juice of mandarin flavor I'd say it earns and also the digestibility ... Try them ! And if you notice there is no butter , but the extra virgin olive oil ......

INGREDIENTS:
500g white flour
grated rind of one orange organic
1 egg
50ml of liqueur aromatic
50ml extra virgin olive oil
100ml tangerine juice
1 heaping tablespoon of white sugar
1 pinch of salt
Peanut oil for frying

First of all, you have the flour into a bowl and add the grated organic orange peel , sugar and pinch of salt. It is necessary that the flour is good spice .... Meanwhile, prepare the mandarin juice : I used a centrifuge. Add the tangerine juice to the flour , stir in extra virgin olive oil , liquor (here the traditional recipe calls for Marsala , but I used an organic herbal liqueur mountain ... it's good limoncello liquor or citrus. Depends your taste ... ) and mix well until dough is smooth and chewy. Let the dough rest for about fifteen minutes, then roll out with a rolling pin until you get to a sheet of an inch thick (you can also use the pasta machine , but I prefer to make the dough by hand, because it becomes more rustic and crunchy ) , then cut into diamond shapes or however you like ( only when I do a mix I like to give various shapes to make small talk to the tray less monotonous and more enjoyable ) . Put plenty of peanut oil in a pan not too big, with high heat and when the oil is hot nice start to put the chatter ; put little at a time because they cook in a few minutes and you risk burning them ! Drain the chatter placing them on a sheet of kitchen paper and sprinkle at the end of icing sugar very thoroughly.

Alternatively, you can sprinkle cinnamon powder or a mixture of cinnamon and sugar depending on your taste .....

In my house like this cake so that doubling the dose usually will prepare the dough and only a half : the other the freeze and pull out when needed ! With the kids at home, best to be prepared for a light and healthy snack on the fly .....

mercoledì 15 gennaio 2014

RAVIOLI DOLCI DI CARNEVALE COTTI AL FORNO


I dolci di carnevale sono tutti molto divertenti e golosi... Oggi ho scelto questi: i ravioli dolci cotti al forno! Ho messo nella pasta frolla la scorza di arancio, perchè in giardino ho un albero di arance amare profumatissime e sono assolutamente biologiche.... Ho scelto anche dei ripieni che potessero abbinarsi con l'aroma di arancia e assaggiando direi che sono venuti proprio bene... 

INGREDIENTI per la pasta frolla all'arancia:

100g di burro ammorbidito
100g di zucchero bianco
1 uovo
200g di farina
scorza di un'arancia amara biologica
sale
1 cucchiaino scarso di bicarbonato

Amalgamate il burro con lo zucchero quindi unite prima l'uovo, poi la farina, la scorza di arancia grattugiata, il sale e il bicarbonato. Ho scelto di grattugiare l'arancia con la grattugia del formaggio, quella che fa le scagliette, perchè volevo che la scorza si sentisse, ma se preferite potete grattarla con una grattugia più sottile... 
Ho fatto riposare l'impasto in frigorifero per una ventina di minuti, coprendo con una tazza e poi ho steso la pasta su una spianatoia spolverizzata di farina; con un bicchiere ho fatto tanti piccoli dischetti che ho riempito in diversi modi: in alcuni un cucchiaino di miele di castagno, in altri della marmellata di uva fragola, in altri delle scagliette di cioccolato fondente alla cannella, poi in alcuni ho messo la marmellata di mandarino con una mandorla intera, ed in altri ancora dei cioccolatini alle nocciole tritati... Potete mettere quello che più vi piace, cercando però di sigillare bene in modo che il ripieno non fuoriesca dal raviolo.
Infornate a forno caldo a 200° per circa 10 minuti, poi fate raffreddare e a piacere potete cospargere di zucchero al velo, cacao amaro... o lasciarli così!!

E' divertente mangiarli per merenda o davanti ad una tazza fumante di te: ogni biscotto ha un sapore diverso e quando addenti non sai quale gusto ti è capitato!!! 

CARNIVAL IN THE OVEN BAKED RAVIOLI

The carnival sweets are all very fun and delicious ... Today I have chosen these: ravioli baked goods ! I put in the pastry orange zest , because I have a tree in the garden of sour oranges are absolutely fragrant and biological .... I have also chosen fillings that could abbinarsi with the aroma of orange and tasting I would say that they came just fine ...

Ingredients for the pastry with orange :

100g butter, softened
100g of white sugar
1 egg
200g of flour
peel of bitter orange organic
salt
1 teaspoon of baking soda

Mix the butter with the sugar first then add the egg, then the flour, grated orange peel , salt and baking soda. I chose to grate the orange with a cheese grater , one that makes the flakes , because I wanted the peel felt , but if you prefer you can scratch it with a cheese grater thinner ...
I made the dough in the refrigerator for about twenty minutes, covering with a cup and then I spread the dough on a work surface dusted with flour , with a glass I made many small disks that I filled in several ways: in some a teaspoon of chestnut honey , jam in other grapes, in other slivers of dark chocolate with cinnamon , then I put on some tangerine jam with a whole almond , and others of chocolates with hazelnuts , chopped ... You can put whatever you like, but try to seal tightly so that the filling does not spill out of the ravioli .
Bake in preheated oven at 200 degrees for about 10 minutes, then let cool and pleasure you can sprinkle icing sugar , cocoa ... or leave it !

It 's fun to eat them as a snack or in front of a steaming cup of tea : Each cookie has a different flavor and taste when you bite into you do not know what happened to you !

mercoledì 22 maggio 2013

ILGATEAU DI PATATE... quello classico!!!

Questa è la versione classica del gateau di patate: quella con il cotto e la  mozzarella come si prepara nel napoletano!!! Poi si può farcire con le melanzane grigliate e la scamorza affumicata, con le uova sode, il formaggio e il salame oppure con i peperoni passati in padella con la cipolla e le sottilette.... insomma a vostra fantasia!!! Io vi passo la ricetta tradizionale... quella che portavo a scuola per la ricreazione!!!

INGREDIENTI:

1kg di patate
2 uova
sale - pepe nero in grani
burro
pangrattato
200g di prosciutto cotto
200g di mozzarella (o provola dolce a fette sottili)
olio extravergine di oliva

Lessate le patate con la buccia in acqua salata, e quando saranno cotte, pelatele e schiacciatele con lo schiacciapatate. Fatele raffreddare, regolate di sale ed unite le uova, una spolverata di pepe nero in grani macinato fresco, e del pangrattato per dare la giusta consistenza all'impasto (questo dipende molto dalla qualità delle patate, comunque diciamo che indicativamente occorreranno un paio di cucchiai di pangrattato). Mescolate bene e poi dividete il composto in due metà. Stendete la prima metà in una teglia da forno precedentemente imburrata e cosparsa uniformemente di pangrattato: livellate bene la superficie delle patate e disponetevi sopra il prosciutto cotto tagliato a fettine sottili (c'è chi preferisce mettere il prosciutto a cubetti), e poi la mozzarella a fette. Ricoprite il tutto con l'altra metà dell'impasto di patate e livellate; quindi praticate con la forchetta alcuni fori, versate un filo d'olio che spalmerete delicatamente con un pennello da cucina e spolverate con il pangrattato. Sistemate sulla superficie del gateau, anche qualche fiocchetto di burro... Infornate a forno preriscaldato a 180° per circa 35 minuti fino a che la superficie del gateau risulti dorata e croccante. Sfornate e servite sia caldo che freddo.....

La bellezza di questa torta salata è che si può mangiare veramente ovunque: tiepida se siete a casa, ma a fette per la merenda a scuola, per la pausa pranzo in ufficio, al mare, in montagna, al lago, per il pic-nic con gli amici, sul treno,...... e ovunque la mangerete, farete venire l'acquolina in bocca a chi vi  guarda!!!! Garantito!!!!!


THE POTATO GATEAU

This is the classic version of the potato gateau: one with the cooked and the cheese as you prepare in Naples! Then you can fill with grilled eggplant and smoked, with hard-boiled eggs, cheese and salami or with peppers in a frying pan with the onion and slices .... in short, to your imagination! I will step to the traditional recipe ... what I brought to school for recreation!

INGREDIENTS:

1kg potatoes
2 eggs
salt - black pepper
butter
breadcrumbs
200g of cooked ham
200g mozzarella (or provolone sweet, thinly sliced)
extra virgin olive oil

Boil the potatoes in their skins in salted water, and when cooked, peel and mash with a potato masher. Let them cool, season with salt and add the eggs, a sprinkling of freshly ground black pepper, and bread crumbs to give the dough the right consistency (this depends greatly on the quality of potatoes, however, say that it will take approximately a couple of tablespoons of breadcrumbs). Mix well and then divide the mixture into two halves. Roll out the first half in a baking pan previously greased and sprinkled with bread crumbs evenly: good leveled the surface of the potatoes and arrange on top of the ham cut into thin slices (some people prefer to put the ham into cubes), and then the mozzarella sliced. Cover with the other half of the potatoes and leveled, then drill a few holes with a fork, pour a little olive oil that spalmerete gently with a pastry brush and sprinkle with breadcrumbs. Arranged on the surface of the pie, even some butter ... Bake in preheated oven at 180 degrees for about 35 minutes until the surface of the pie is golden brown and crisp. Remove from the oven and serve hot or cold .....

The beauty of this pie is that you can eat really everywhere: if you are warm at home, but on slices for school lunches, lunch break in the office, at the seaside, in the mountains, the lake, the picnic with friends, on the train, ...... and wherever you eat, you will make watering mouths of those who look at you!! Guaranteed!!

giovedì 16 maggio 2013

BARCHETTE DI SEDANO CON CREMA DI BLUDICAPRA E MANDORLE...

Sempre ricordando il passato, ecco balenare alla memoria le barchette di sedano! Mia mamma metteva una crema fatta di gorgonzola cremoso e mascarpone ed era uno degli antipasti cult di casa!!! Beh oggi il mascarpone cerchiamo di sostituirlo con qualcosa di più leggero ed anche al vecchio e tradizionale gorgonzola di una volta, preferiamo il bludicapra.... il gorgonzola delicato e con meno colesterolo!!! E al posto del mascarpone???? Direi che il latte va benissimo!!!!!! Tanto gusto e leggerezza: si può!!!

INGREDIENTI PER 4 PERSONE:

4 coste di sedano belle tenere
350g di bludicapra
100ml di latte parzialmente scremato
300g di noci
Olio - sale - pepe nero in grani
Miele di acacia

Tagliate il sedano in pezzi lunghi circa 10cm, dopo averli lavati sotto l'acqua corrente: privateli dei filamenti e disponeteli in un piatto da portata. Amalgamate il bludicapra con un pò di latte (mettetelo poco per volta) e lavorate con una forchetta fino ad ottenere un composto omogeneo; quindi mettete un filo d'olio, una spolverata leggera di pepe nero macinato fresco e regolate di sale (spesso non serve, quando il bludicapra è bello maturo). Farcite ora il sedano con la crema di bludicapra e disponete disordinatamente le noci sgusciate e tritate grossolanamente; rigate con il miele di acacia a filo e lasciate riposare in frigorifero circa una trentina di minuti prima di servire!!!

Potete accompagnare questi invitanti stuzzichini, con delle piccole bruschette di pane con olio extravergine di oliva, sale e pepe nero macinato fresco.....

Per informazioni sulla possibilità di ordinare online il bludicapra da azienda agricola biologica, il miele di acacia della Lunigiana (buonissimo con tanto di bollino di Toscana Miele): amicalunigiana@hotmail.com  Consegnamo ovunque!!!


BOATS OF CELERY BLUDICAPRA ...

Always remembering the past, here is flashed to mind the boats of celery! My mom put a cream made of creamy gorgonzola and mascarpone and was one of the starters cult of the house! Well today the mascarpone try to replace it with something lighter and also to the old and traditional gorgonzola than once, we prefer the bludicapra .... gorgonzola with delicate and less cholesterol! And instead of mascarpone?? I would say that the milk is fine!! Both taste and lightness: you can!

INGREDIENTS FOR 4 PEOPLE:

4 stalks of celery beautiful hold
350g bludicapra (goat cheese)
100ml semi-skimmed milk
300g walnuts
Oil - salt - black pepper
Acacia honey

Cut the celery into pieces about 10cm long, after being washed under running water: privateli of the filaments and arrange in a serving dish. Mix the bludicapra with a little milk (put it a little at a time) and work with a fork until mixture is smooth, then put a little oil, a light dusting of fresh ground black pepper and salt to taste (often not needed when the bludicapra is beautiful mature). Now stuffed celery with cream and arrange bludicapra disorderly walnuts, shelled and coarsely chopped; pasta with acacia honey flush and let stand in refrigerator for about thirty minutes before serving!

You can accompany these tasty snacks, with small toasted bread with extra virgin olive oil, salt and freshly ground black pepper .....

For information on the ability to order online bludicapra from organic farm, acacia honey from Lunigiana (yummy with lots of sticker Tuscan Honey): amicalunigiana@hotmail.com We deliver everywhere!


martedì 30 aprile 2013

ZUCCHINE RIPIENE cotte al forno....

Un sapore squisito che mi ricorda moltissimo la mia infanzia: mia mamma le preparava spesso e le portavamo anche al mare per un pranzo gustoso e frugale da consumare fra un castello di sabbia e un bagno!!! Ce ne sono di tantissime versioni: questa è la versione di casa mia..... Ho già messo una ricetta di zucchine ripiene (vedi ZUCCHINE RIPIENE DI.... ZUCCHINE), ma questa è una ricetta storica e di famiglia!!!! 

INGREDIENTI PER 4 PERSONE:

4 zucchine piuttosto grandi
150g di prosciutto cotto
2 uova
100g di scamorza affumicata
2 cucchiai di parmigiano grattugiato
prezzemolo 
1 spicchio di aglio
sale - pepe in grani macinato fresco
pangrattato

Pulite le zucchine, togliete la parte laterale e svuotatele leggermente della polpa interna; lessate per un cinque minuti le "barchette" così ottenute e fatele poi raffreddare tenendole su un canovaccio pulito e asciutto. In una padella antiaderente riscaldate un filo d'olio ed insaporite con lo spicchio di aglio tritato finemente: aggiungete la polpa delle zucchine e fate cuocere per circa 5 minuti. In una ciotola versate la polpa delle zucchine, le uova, il prosciutto cotto tritato grossolanamente, la scamorza a tocchetti piccoli, il prezzemolo, il parmigiano; salate e pepate. Con questo composto riempite le barchette di zucchine che disporrete poi in una teglia rivestita di carta da forno. Cospargete le zucchine ripiene con il pangrattato ed infornate a forno preriscaldato a 180° per circa 40 minuti (come sempre la superficie deve essere dorata ma controllate perchè ogni forno ha dei tempi differenti). Potete servire le zucchine ripiene leggermente tiepide con verdure fresche in insalata e bruschette di pane, ma come dicevo prima, sono ideali anche a temperatura ambiente, specie se le consumiamo al mare, in campagna, in ufficio..... 

THE ZUCCHINI STUFFED baked
A delicious flavor that reminds me very much of my childhood: my mom made ​​them often and we took them to the seaside for a tasty lunch and frugal to consume between a sand castle and a bath at the sea! There are many versions: this is the version of my house ..... I've already put a recipe for stuffed zucchini (see ZUCCHINI RIPIENE DI..... ZUCCHINI), but this is a recipe historical and family!
INGREDIENTS FOR 4 PEOPLE:
4 courgettes rather large
150g of cooked ham
2 eggs
100g smoked
2 tablespoons grated Parmesan cheese
parsley
1 clove of garlic
salt - Freshly ground pepper
breadcrumbs
Peel the zucchini, remove the side and slightly empty them of the inner pulp, boiled for five minutes the "boats" thus obtained and then let them cool on a towel keeping them clean and dry. In a pan heat a little olive oil and seasoned with a clove of finely chopped garlic, add the pulp of the zucchini and cook for about 5 minutes. In a bowl, pour the pulp of the zucchini, eggs, coarsely chopped cooked ham, smoked cheese into small pieces, parsley, Parmesan cheese, salt and pepper. With this mixture fill the boats of zucchini you will place them into a baking tray lined with baking paper. Sprinkle the zucchini stuffed with breadcrumbs and bake in preheated oven at 180 degrees for about 40 minutes (as always, the surface should be golden but check because every oven has different times). You can serve the stuffed zucchini slightly warm with fresh vegetables in a salad and toasted bread, but as I said before, they are ideal even at room temperature, especially if we consume the sea, in the countryside, in the office .....

giovedì 21 marzo 2013

L'INSALATA DI POLLO PER IL MERENDINO DI PASQUETTA

Fra poco arriva la Pasqua, e come tutti gli anni per il lunedì di Pasquetta è tradizione andare in campagna per un pic nic con le persone più care e gli amici più simpatici!!! Immancabile l'insalata di pollo, ricca di tantissimi ingredienti ma nello stesso tempo invitante e leggera:

INGREDIENTI:
1 petto di pollo intero
2 pomodori maturi (o una manciata di pomodorini)
2 carote fresche
una manciata di olive nere denocciolate
cipolline sott'aceto
capperi sott'aceto o in salamoia
1 insalata belga
Sale e maionese

Lessate il petto di pollo in acqua salata a bollore, fatelo cuocere bene quindi raffreddatelo e tagliatelo a pezzetti piuttosto piccoli. Nel frattempo, lavate l'insalata belga, tagliatela a fettine molto sottili e disponete in una ciotola capiente; aggiungete le olive denocciolate (io spesso le taglio per amalgamarle meglio al tutto), i pomodori a cubetti, le carote a pezzetti, le cipolline e i capperi sott'aceto ed infine il pollo. Mescolate bene, ed incorporate delicatamente la maionese (la quantità della maionese è a piacere... a noi non piace metterne troppa, ma ciascuno si regoli in base ai gusti dei commensali), quindi fate riposare in frigorifero coprendo con un foglio di pellicola trasparente! Servo questa insalata con crackers o con piccole striscioline di focaccia fatta in casa.

Consiglio di portare questa insalata in una borsa termica in modo da garantirne la freschezza... e di servirla accompagnando con un ottimo bicchiere di rosato Monterosa dei Colli del Candia. (Prezzo a bottiglia: 6.50euro)

CHICKEN SALAD FOR EASTER MONDAY


Soon comes the Easter, and like every year for Easter Monday tradition is going to the country for a picnic with your loved ones and friends nicer! Inevitable chicken salad, full of many ingredients but at the same time inviting and light:

INGREDIENTS:
1 whole chicken breast
2 ripe tomatoes (or a handful of cherry tomatoes)
2 fresh carrots
a handful of pitted black olives
pickled onions
pickled capers in brine
1 Belgian endive
Salt and mayonnaise

Boil the chicken in salted water to a boil, then cook it well raffreddatelo and cut into pieces quite small. Meanwhile, wash the endives, cut into very thin slices and place in a large bowl, add the pitted olives (I often cut amalgamarle better at all), the diced tomatoes, chopped carrots, onions and pickled capers and finally the chicken. Mix well, and incorporated gently mayonnaise (the amount of mayonnaise to taste ... we do not like to put too much, but each one adjusts according to the tastes of the guests), then place in the refrigerator covered with a sheet of plastic wrap ! Serve this salad with crackers or small slices of homemade cake.

Council to bring this salad in a cooler in order to ensure freshness ... and serve accompanied with a glass of rosé Monterosa the hills of Candia. (Price per bottle: 6.50euro info: amicalunigiana@hotmail.com)


domenica 27 gennaio 2013

IL TIRAMISU' ALLA BANANA... da provare!

Far mangiare la frutta ai ragazzi non è sempre facile, così ho pensato ad un tiramisù con la frutta.... in questa ricetta ho messo le banane, ma a volte metto il melone, le fragole, le mele, le pere: quello che ho in casa!
Non metto il caffè, perchè mio figlio piccolo e mio nipote hanno rispettivamente 7 ed 8 anni, quindi uso il latte aromatizzato alla vaniglia, per dare un tocco di intrigante sapore!

INGREDIENTI:
500 g mascarpone
2 uova fresche
1 bacca di  vaniglia
100ml di latte fresco intero + qualche cucchiaio
250g di zucchero semolato
4 banane
Limone qualche goccia
1 confezione di Pavesini
Cacao amaro q.b.

Lavorate il mascarpone in una ciotola in modo da renderlo una crema, poi unite le 2 uova e lo zucchero. Ricoprite un contenitore di servizio con uno strato di questo composto ottenuto e disponete il primo strato di Pavesini inzuppati nel latte dove avrete messo a macerare per almeno 12 ore la bacca di vaniglia aperta (naturalmente il latte va poi filtrato!!!). Disponete sui Pavesini uno strato di banana frullata con un pochino di latte e qualche goccia di limone e poi un nuovo strato di crema al mascarpone, uno di Pavesini ed uno leggero di banana frullata. Io faccio in modo che mi vengano 3 strati di biscotti per avere un tiramisù del giusto spessore. Terminate il dolce spendendo bene sulla superficie la crema di mascarpone e poi mettete in frigorifero a riposare per almeno 4/5 ore! Prima di servire, spolverate abbondantemente con il cacao amaro in polvere.

Preferisco la banana frullata a quella a rondelle, perchè si annerisce meno e rende il tutto più appetitoso e meglio distribuito!

THE BANANA'S TIRAMISU'.... Try il!


To eat fruit to children is not always easy, so I thought of a tiramisu with fruit .... In this recipe I put the bananas, but sometimes I put the melon, strawberries, apples, pears, what I have at home!
I do not put the coffee, because my young son and my nephew, respectively 7 and 8 years, so I use milk flavored with vanilla, to give a touch of intriguing flavor!

INGREDIENTS:
500 g mascarpone
2 eggs
1 vanilla bean
100ml of milk, a few tablespoons +
250g caster sugar
4 bananas
A few drops lemon
1 box of Pavesini
Unsweetened cocoa q.b.

Work the mascarpone in a bowl to make it a cream, then add the 2 eggs and sugar. Coat a mixing container with a layer of this mixture and place the first layer of Pavesini soaked in milk where you left to soak for at least 12 hours the vanilla bean open (of course, the milk is then filtered!). Arrange on Pavesini a layer of banana puree with a little milk and a few drops of lemon and then a new layer of mascarpone cream, one of Pavesini and a slight banana puree. I make sure that I will be 3 layers of cookies for a tiramisu the right thickness. Finish the cake getting value on the surface mascarpone cream and then put in the fridge to rest for at least 4/5 hours! Before serving, sprinkle abundantly with cocoa powder.

I prefer the banana puree to the slices, because it blackens less and makes it more palatable and better distributed!


giovedì 17 gennaio 2013

LA FARINATA ALLA LIGURE

INGREDIENTI PER 4 PERSONE: 
500 g farina di ceci
3 rametti rosmarino
1 bicchiere di olio extravergine di oliva 
sale e pepe

Preparazione:
Mettete la farina di ceci in una ciotola capiente e incorporate lentamente l’acqua.
Mescolate sino a quando otterrete un composto omogeneo e senza grumi, dopodiché lasciatelo riposare per una notte intera.
L’indomani rimuovete la schiuma che si sarà formata sulla superficie, unite il sale, l’olio e mescolate, in modo da amalgamare bene tutti gli ingredienti.
Versate il composto in una teglia ben oliata e completate con il rosmarino, il pepe e una spolverata di sale.
Infornate in forno preriscaldato a 190°C per circa 20 minuti, sino a quando la farinata diventerà dorata sulla superficie.
Sfornatela e fatela raffreddare a temperatura ambiente prima di servirla.

Idee e varianti:
Servite la farinata già tagliata a spicchi, in modo che sia più facile gustarla come aperitivo, insieme a un buon bicchiere di vino bianco frizzante... abbiamo anche lo Stregato dalla Luna, veramente stuzzicante ed ideale per accompagnare la farinata!

PREZZI: Farina di ceci in sacchettini da 500g   2 euro
           Vino Frizzante Stregato dalla Luna da 750ml     9 euro
           Olio extravergine di oliva della Lunigiana da azienda agricola da 750ml      15 euro
SPEDIAMO OVUNQUE!!!!!! Per info: amicalunigiana@hotmail.com


INGREDIENTS FOR 4 PEOPLE:
500 g chickpea flour
3 sprigs rosemary
1 cup of extra virgin olive oil
salt and pepper

preparation:
Put the chickpeas in a large bowl and stir in the water slowly.
Mix until you get a smooth mixture with no lumps, then let it rest for a whole night.
The next day, remove the foam that is formed on the surface, add the salt, oil and mix in order to mix all ingredients well.
Pour the mixture into a well-oiled baking sheet and completed with the rosemary, pepper and a sprinkling of salt.
Bake in a preheated oven at 190 ° C for about 20 minutes, until the porridge becomes golden on the surface.
Sfornatela and let cool to room temperature before serving.

Ideas and variants:
Serve the porridge already cut into pieces, so that it is easier to be enjoyed as an aperitif, with a glass of sparkling white wine ... we also have the Bewitched by the Moon, really tasty and ideal to accompany the porridge!

PRICES: chickpea flour in bags of 500g 2 euro
            Bewitched by the Moon Sparkling Wine 750ml € 9
            Extra virgin olive oil from the Lunigiana farm 750ml 15 €
SHIP ANYWHERE!! For info: amicalunigiana@hotmail.com

mercoledì 21 marzo 2012

TESTAROLI, CHE PASSIONE!!!!

I testaroli sono dei dischi di pasta realizzati in modo semplicissimo: acqua, farina e sale! Un tempo venivano cotti sotto la cenere e lessati in acqua a 80 gradi..... oggi li troviamo già pronti interi in confezione sottovuoto, oppure in pratiche vaschette già tagliati e pronti all'uso!!! La preparazione è semplicissima: ti tuffano per 3 minuti in acqua salata a bollore (la tradizione vorrebbe che il fuoco fosse spento) e si scolano per poi condirli con le nostre salse o più semplicemente con olio e formaggio!!! In pochi minuti si può assaporare un piatto sincero e pieno di tradizione!!!
E' possibile riceverli direttamente a casa tua, ordinandoli ad amicalunigiana@hotmail.com, oppure nel negozio del Castello di Terrarossa, in piazza del Castello di Terrarossa, 53016 Terrarossa - Licciana Nardi (MS).
Nel negozio, tantissimi prodotti tipici della Lunigiana in una cornice davvero splendida!!! Ti aspettiamo....

PREZZI: testarolo intero da 420g confezione sottovuoto  2,50 euro
              testarolo tagliato in vaschetta da 300g    2,30 euro
              Orcetto di pesto genovese non pastorizzato da 180g    7,50 euro
              Orcetto di crema di noci da 180g       7 euro
              Olio extraverdine di oliva locale da 750ml     15 euro    buonissimo e dolce!!!
SPEDIAMO OVUNQUE! Per info e tariffe di spedizione: amicalunigiana@hotmail.com

Testaroli are disks of dough made ​​so simple: water, flour and salt! Oncethey were cooked under the ashes and boiled in water at 80 degrees .....Today we find them ready-made vacuum packed whole or in convenienttrays already cut and ready to usePreparation is simple: you dive for 3 minutes in salted water to a boil (thetradition dictates that the fire was off) and then dress it down with oursauces or simply with olive oil and cheese! Within minutes you can enjoy a plate full of sincere and tradition!
And 'possible to receive them directly to your door, ordering them to amicalunigiana@hotmail.com, or in the shop Terrarossa Castle Square inthe Castle Terrarossa Terrarossa 53016 - Licciana Nardi (MS).
In the shop, lots of products typical of Lunigiana in a truly beautiful setting!We are waiting .....


PRICES: testarolo integer from 420g vacuum pack € 2.50
               testarolo cut in pan 300g 2.30 €
               Orcetto of pesto unpasteurized 180g 7.50 €
               Orcetto of walnut cream 180g 7 euro
               Extraverdine local olive oil 750ml 15 euro delicious and sweet!
WE SHIP EVERYWHERE! For info and shipping rates: amicalunigiana@hotmail.com

sabato 26 marzo 2011

Ma ve le ricordate???????

Non molto tempo fa, mi hanno chiamata a Roma per organizzare una cena privata per il compleanno di una simpatica signora... il tema era la cucina tradizionale toscana! Mentre preparavo il patè di fegatini e la pappa al pomodoro, ho incominciato a viaggiare indietro nel tempo alla mia infanzia..... ma ve li ricordate gli antipasti di 30 anni fa??? Non mancavano mai i Ritz con la fettina di salame e il pezzetto di groviera, tutto infilzato in uno stuzzicadenti; c'erano poi le tartine fatte con il pancarrè (ma anche con il pane) imburrato e con sopra l'acciughetta sott'olio, oppure la maionese con l'uovo sodo sbriciolato! E le uova ripiene del rosso miscelato con la maionese e sopra il pezzetto di peperone rosso sott'aceto????? Le mamme ce ne facevano mangiare al massimo 2 perchè dicevano che facevano male al fegato........ Vi rammentate dei grissini avvolti nel prosciutto cotto o crudo, o il patè di tonno in scatola allungato con la maionese e le patate lesse schiacciate????? L'insalata russa che era una vera prelibatezza al tempo mentre oggi non si fa quasi più... le botte di creatività di mia mamma arrivavano a metterla dentro le foglie di lattuga: le ricordo ancora con un pizzico di nostalgia.... sarebbe bello riprendere in mano quei ricordi e trasformarli in una cena degli anni '70!!!.... magari concludendo con una bella zuppa inglese, tanto fuori moda!!!

giovedì 24 marzo 2011

IL PANCOTTO alla toscana... sapore d'infanzia...

Il mio figlio maggiore, Umberto, è cresciuto a pancotto.... spesso aggiungevo un uovo oppure del prosciutto cotto sbriciolato per aggiungere le proteine a questa preparazione semplice ma eccezionale!!! Ne mangiava a tonnellate.... L'idea mi era stata suggerita da mia madre, perchè il pancotto è molto digeribile e leggero ed è ideale per i bimbi! Ma credetemi se vi dico che è favoloso e piace veramente a tutti. Qui metto la ricetta base, quella originale, anche se nei tempi andati era molto più ricca di aglio, perchè dava sapore, faceva bene e liberava dai vermi intestinali! Fortunatamente non abbiamo più di questi problemi e possiamo gustarci la versione equilibrata e gustosa di questo meraviglioso piatto toscano....

INGREDIENTI PER 4 PERSONE:

300 gr circa di pane raffermo (possibilmente sciapo)
2 spicchi di aglio
Del Parmigiano grattugiato
Olio extravergine di oliva buono e sale

In una pentola portate ad ebollizione un litro di acqua leggermente salata, aggiungete quindi il pane spezzettato e gli agli interi vestiti (che a fine cottura toglieremo). Cuocete piano piano per circa 15 minuti, avendo cura di girare sempre con un cucchiaio di legno; incorporate poi 4 cucchiai di olio buono e parmigiano in dose generosa e a seconda dei gusti. Date un'ultima amalgamata sempre sul fuoco e poi spegnete la fiamma: fate riposare qualche minuto e servite aggiungendo un altro filo di olio e una manciata di parmigiano...

Questo piatto può essere servito caldissimo oppure anche freddo o a temperatura ambiente a seconda della stagione e dei gusti. Personalmente lo prediligo calduccio anche in estate....

Pancotto Tuscan ... taste of childhood ...
My eldest son, Umberto, grew up in pancotto .... often add an egg or hamcrumbled cooked to add protein to this preparation simple but great! Ate aton .... The idea was suggested to me by my mother, because the bread soup is very digestible and light and is ideal for children! But believe me when I say it is fabulous and really like it at all. Here I put the basic recipe,the original, although in times past was much more rich in garlic, because itgave flavor was good and free of intestinal worms! Fortunately we no longer have these problems and we can taste the delicious and balanced versionof this beautiful Tuscan dish ....

INGREDIENTS FOR 4 PEOPLE:

About 300 grams of bread (preferably unsalted)
2 cloves of garlic
Of grated Parmesan cheese
Good extra virgin olive oil and salt

In a saucepan bring to boil one liter of lightly salted water, then add thebread broken and the whole clothes (at the end of cooking, remove). Cookslowly for about 15 minutes, taking care to always run with a wooden spoon,then built 4 tablespoons good olive oil and Parmesan cheese and generousdose depending on your taste. Date last amalgamated always on fire andthen turn off the heat: let stand a few minutes and served by adding anotherdrop of oil and a handful of parmesan cheese ...

This dish can be served hot or too cold or at room temperature according toseason and taste. Personally I prefer the warmth even in summer ....